
Temple Dog Tube Fly
The Temple Dog Tube fly is one that has come from Norway over recent years. It is a very successful fly in that it has a great deal of movement to it and has the ability to be fished both in slow streams and fast water alike.
The pattern described below has been very successful for me catching salmon in both our own waters and those water I have been fortunate to fish outside of wales. The original pattern was tied with temple dog hair which is as it suggests the very fine long soft fibres from dogs that are used to pull snow sledges. It’s not easy to get hold of and is not cheap! I have used arctic fox and black bear in this tying which is readily available.
The dressing is as follows;
- Tube: A 1″ to 2″ tube of either copper or aluminium is normal.
- Tag: Fine gold oval tinsel
- Butt: Fluorescent floss (Globright No 5 is close enough)
- Tail: Antron floss (Colour to match tag)
- Body: Rear Gold holographic tinsel Front Black floss or seals fur
- Rib: Small gold oval tinsel
- Body hackle: Red dyed badger(With a black centre)
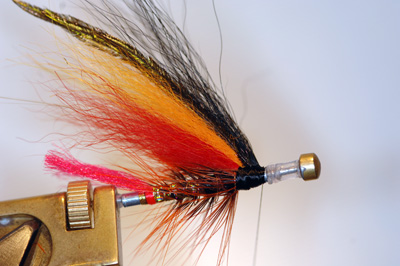
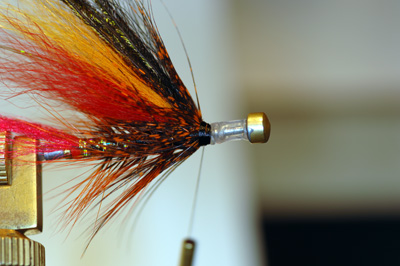
- Wing: Red arctic fox under, strands of gold holographic tinsel, under orange arctic fox, under peacock herl, under black bear hair.
- Front Hackle: Orange dyed gallina (Guinea Fowl)
- Cheeks: Jungle cock eyes.
The fly can be tied on normal salmon hooks but I would recommend the Partridge Salar range in doubles as they were designed for the job and are excellent hookers.
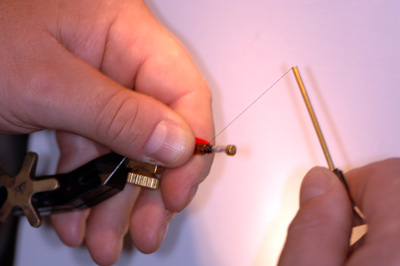
Firstly fit your tube onto a tube vice of your choice and make sure that it is not going to slip or turn during the tying.
I have seen a nearly completed fly spin like a whirling dervish disregarding all the materials in all directions. You have been warned it happens.
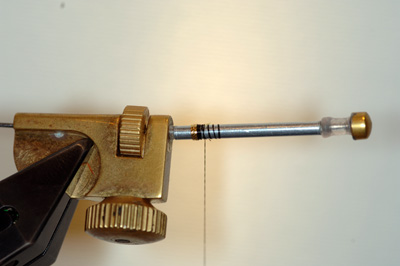
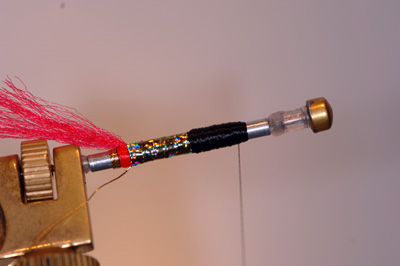
Now tie in the tag and make 4 or 5 turns.
It’s important to remember that the tag is there to stop everything else from slipping off. The first turn of the tag should be on the bare tube and then advanced in touching turns on waxed silk to help it stay secure.
Tie off the tag and tie in the floss butt.
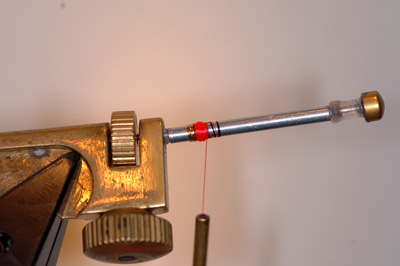
Now tie in the tail. This will need to extend far enough to cover the hook when fishing.
To ensure it doesn’t pull out and to keep an even body tie it along the length of the tube. Remember to leave space for the winging material though.
Tie in the ribbing material. Again it is better to make sure that it will be secured properly as this rib will secure your body hackle later. If the rib is not secured in properly the swearing will be heard on the continent. Trust me I have learnt from experience.
It is a good idea to tie the rib in the length of the body as the tail has been.
I change the tying silk back to black at this stage. Use any that you like but my choice is Danville’s 6/0 fly master. This is great as you can spin it clockwise and it tightens to 8/0 size but alternatively, you can spin it anti-clockwise and it flattens completely so allowing a smooth body to be produced.
It worth remembering that if you are right-handed that as you tie you put clockwise twists into your tying silk with each turn. Perhaps this is why your silk breaks as you come to complete your new fly?

The rear body material can be tied in at this point. It is a decision for you whether to put in a single or double layer of tinsel.
I am of the double school of thought as I am then sure that there will be a possibility of exposing any of the underbody.
If you are of the same view tie the tinsel at the middle of the tube and wind down to the tail/butt and back to the tying in point and tie off and remove the waste.
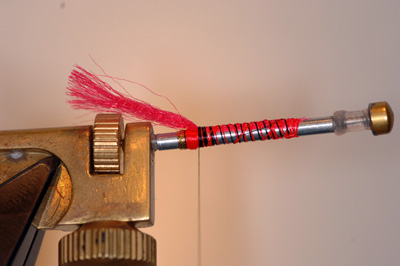
Now form the front half of the body with the black floss.
I like to use 280 denier silk for this as it can be tied in tighter than most and is quicker.
I then over rib it with the tying silk so as to again develop added strength to the fly.

Tie in the hackle. I do this by choosing a fairly large hackle from the cape. I then clean off the waste from the stem and tie in the stem with a figure of eight tie in with the good side of the hackle facing the head of the fly.
Then apply the hackle pliers to the tip of the hackle and wind it in one full turn then down the shank in open turns to the midway of the rear body section.
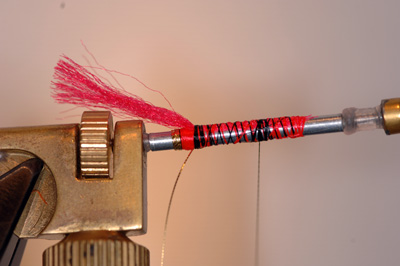
Now take the ribbing material and wind it forward in exactly the same direction as the hackle.
You should make two open turns along the body before trapping the hackle down.
Continue to wind over the hackle up to the head and tie off with two turns of tying silk.

The reason for turning the rib in the same direction as the hackle is that it will trap the stem of the hackle on each turn because they have been turned from opposite ends of the fly and subsequently cross each other.

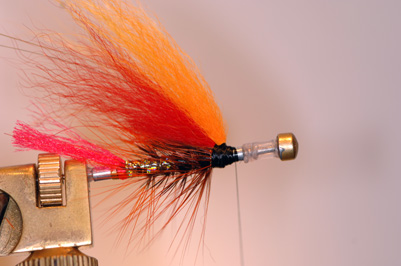
The whole point of tying this type of fly is to get as much movement out of all its materials as you can.
This is done by tying the wing initially forward over the head of the fly. This will allow you to leave a short stump of material in the wing for the wing to press on when tied back.
Initially tie the first piece of winging material on to the top of the tube shank. Do this by way of pinch and loop technique which has been described in detail on other patterns on this site. You will need no more than 5 turns.
Now trim the rear pointing waste at an angle of 45% upwards (see photo above)
Pull the forward-facing fibres back and with the silk make turns in front of this wing.
It is important not to tie the wing down but trap it back with the silk.
See the photo below.
The angle of the silk is important in that it is laid at the back of the tying in point on the underside of the tube shank and in front of the wing on the top of the shank roughly at an angle of 45%.
I have added another photo to try and make it more clear.

Let go of your death grip on the wing if it is lying too far back you have tied it down with too many turns. Alternatively, if the wing springs forward it does not have enough turns in front of it.
Once completed on the first part then add the gold tinsel in the same manner.

Then the orange arctic fox is added in exactly the same way.

Now you may realise why so much room has been left at the head of the fly.
Once this wing has been tied back go on to the peacock herl.
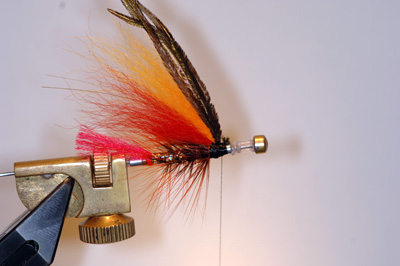
I prefer to take my herl from the quill so that I can choose the shape of them to ensure that they flow back over the wing nicely. It also makes it easier to tie in.
Now tie in the black bear hair as before.

That is the wing complete.
Form a bed of silk to take the orange dyed guinea fowl (Gallina) and double the hackle back so that all the fibres are on one side of the stalk.
Tie this feather in by the tip with the fibres pointing backwards.
Now wind it forward in touching turns for three to four turns and tie off.
I now take the silk and carefully tie down over the last turn of the stalk of the throat hackle giving it extra security.
The only thing left is to tie in the jungle fowl feathers on each side of the wing.
I like to tie them in at an angle so that they follow the shape of the wing when its wet.
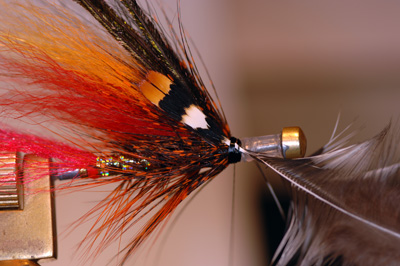
Form a nice tight shaped silk head. Wax your silk before you do this because if you don’t the thread may slip off and everything will unravel. The key point to this fly is the shape of the wing and a small tight head. Varnish and allow to dry.

If you have any difficulties with it then go to the forum and ask what to do and I will attempt to put you on the right track.
Good luck it’s a great fly.